
Sheet metal design guidelines are simple rules that help a shop cut and bend your part without cracks, stretched holes, or a re-quote. Most rules use the metal’s thickness, called T. Keep holes at least 1T wide and flanges at least 4T long. Keep holes at least 3T plus the bend radius from a bend.
If you design or buy parts, this guide gives you those numbers in plain words. You will also learn what bend relief is, how to lay out an enclosure, and what to check before you send a file. We have fabricated metal parts in Marion, Ohio since 1981, so these tips come from the shop floor.
What Are Sheet Metal Design Guidelines? The Rules Shops Wish Every Designer Knew
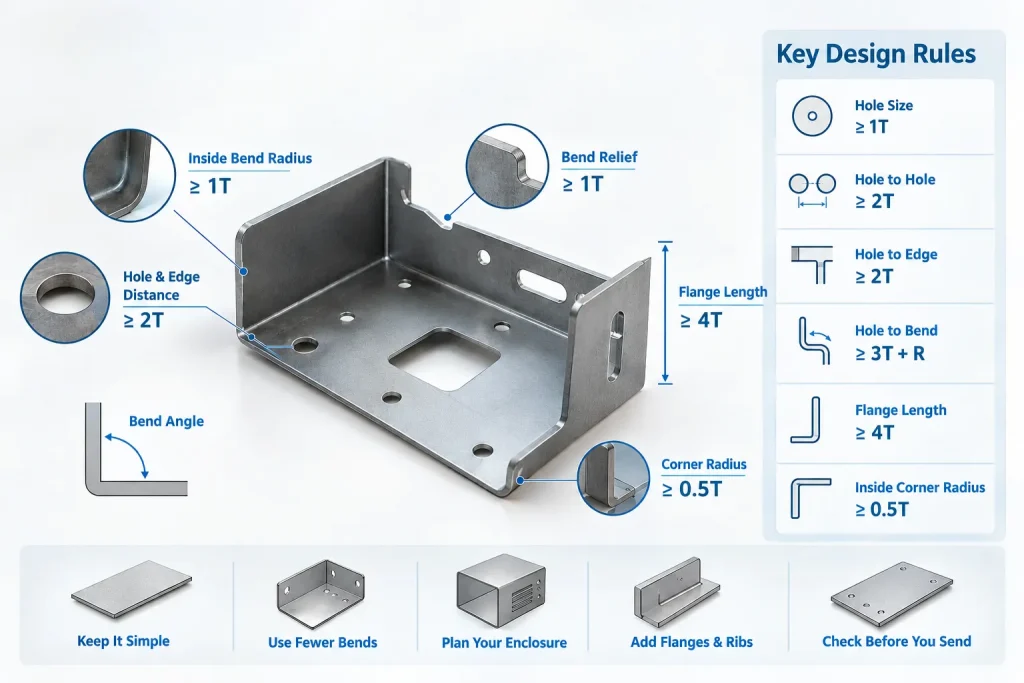
Sheet metal design guidelines are simple size and spacing rules. They tell you how big a hole can be, how close it can sit to a bend, how long a flange must be, and how tight a corner can get. Most are written as multiples of the metal’s thickness (T), so the same rule works for thin aluminum and thick steel. Why do these rules matter? A flat sheet can be cut into almost any shape, and our shop’s lasers do this every day. The trouble starts at the bend, where the outside of the metal stretches and the inside squeezes. A hole, slot, or corner in the wrong spot can crack, warp, or pull out of shape. A design that follows the rules avoids this, needs fewer special tools and setups, and rarely needs changes after quoting. For Ohio buyers ordering brackets, guards, and enclosures, that means faster quotes and parts that fit the first time.
What Are the Basic Thumb Rules for Sheet Metal Design?
These thumb rules for sheet metal design fit most steel, stainless, and aluminum parts. Treat them as safe starting points, since your shop’s tools set the final limits. The numbers below are the same ones we follow when we cut parts through our precision cuts we handle in-house and bend them in house.
|
Feature |
Rule of thumb |
|
Hole size |
At least 1T |
|
Hole to edge |
At least 2T |
|
Hole to hole |
At least 2T |
|
Hole to bend line |
At least 3T + bend radius |
|
Slot width |
At least 1T |
|
Notch width |
At least 1.5T (length no more than 5T) |
|
Tab width |
At least 2T |
|
Inside bend radius |
At least 1T (harder metals need more) |
|
Flange length |
At least 4T |
|
Bend relief width |
At least 1T |
|
Inside corner radius |
At least 0.5T |
For Example: For 0.06″ thick steel (about 16 gauge), holes should be at least 0.06″ wide. Keep a hole at least 0.24″ from a bend with a 0.06″ radius. Make flanges at least 0.24″ long.
Rule 1: Lock In Thickness Before You Draw Anything Else
Every number in the table depends on T, so decide it first.
- Use one thickness for the whole part.
- Write the thickness in decimals and name the material. “14 gauge” alone is not enough, because the same gauge differs in steel and aluminum. Our sheet metal gauge chart shows how.
- Ask your shop which thicknesses it keeps in stock. An uncommon thickness can mean a longer wait.
- Size parts to fit common sheets, like 4 ft × 8 ft or 4 ft × 10 ft. Parts that nest well waste less metal, and you pay for scrap.
Rule 2: Space Holes, Notches, and Tabs So They Still Work After Bending
A laser can cut a hole almost anywhere on a flat sheet. These rules keep every cut feature usable once the part is bent.
- Hole to bend: at least 3T plus the bend radius.
- Hole to edge and hole to hole: at least 2T. Thin strips between holes can warp.
- Notches: at least 1.5T wide and no longer than 5T.
- Tabs: at least 2T wide. Avoid long, skinny ones, because they bend out of shape.
Rule 3: Add Bend Relief Where a Bend Meets an Edge
Bend relief is a small cut at the end of a bend line. Without it, the metal can tear or bulge at that corner. These sheet metal bend relief guidelines are easy to follow:
- Cut it at least as wide as the metal is thick.
- Extend it a little past the bend line.
- Use a round end when you can. It spreads the force better than a sharp square corner.
- Skip it if the bend runs the full width of the part. Nothing is left to tear.
Rule 4: Draw Your Bends So the Shop Can Read Them
Clear bend details save back-and-forth emails, and fewer bends save money.
- Combine features to cut the bend count. Every bend adds forming, handling, and inspection time.
- Point bends the same direction when you can, so the part gets flipped less.
- Mark each bend with its angle, direction, and inside radius. A 90° bend can go up or down, and the file must say which.
- Check with your shop before putting two bends close together.
- Avoid shapes that trap the tool, like a narrow channel with tall walls.
- For tonnage, bending methods, and springback, read our press brake forming guide.
Rule 5: Stiffen With Flanges, Hems, and Ribs Instead of Thicker Metal
- A flange is the bent-up edge of a part. It adds stiffness and gives you a surface to mount or fasten to.
- Make every flange at least 4T long.
- A hem is a folded-over edge. It removes a sharp edge and stiffens a panel. Keep the fold about 4T long.
- A flange, hem, or rib can often let you use thinner, cheaper sheet.
Rule 6: Round Your Inside Corners
- Sharp inside corners are weak spots.
- A radius of at least 0.5T makes the part stronger and easier to cut cleanly.
Sheet Metal Enclosure Design Guidelines (Rules 7 to 9)
Enclosures are among the most common sheet metal parts. These three rules keep yours simple, strong, and easy to assemble.
Rule 7: Use Fewer Pieces and Leave Room to Weld
- A U-shaped body with a wrap-around cover often costs less than a welded box.
- Plan corners early: add corner relief, or decide if they will be welded or overlapped.
- Leave about 2 inches of open space so a welding torch can reach inside corners.
Rule 8: Place Vents and Hardware Early
- Keep louvers and slots at least 2T from every bend.
- Press-in nuts and studs need space from bends, so check the hardware data sheet first.
- A tapped hole needs at least 3 full thread turns in the sheet. On thin sheet, use a self-clinching nut instead.
- Keep countersinks no deeper than 0.6T.
- Mixing metals, such as steel screws in aluminum, can cause corrosion over time.
Rule 9: Leave Room for Your Finish
- Paint and powder coat add a thin layer to every face.
- Leave a small gap at hinges, seams, and sliding panels so parts still fit after finishing.
- Pick the finish before you set your clearances.
Rule 10: Run a Quick Check Before You Send the File
- Is the thickness written in decimals, with the material named?
- Does the flat pattern unfold without overlaps?
- Did you send a 3D model (STEP) and a 2D drawing?
- Is every bend marked with its angle, direction, and radius?
- Have you marked which faces are cosmetic and which are hidden?
- Do your fastener and sheet metal types match?
Frequently Asked Questions
Q1. What is sheet metal design?
It is planning a part that starts as a flat sheet and becomes 3D by cutting and bending. You set the thickness, shape, holes, bends, and tolerances so a shop can build it.
Q2. What are the fundamentals of sheet metal design?
Base sizes on thickness, plan for the bend stretch, keep the part simple, and design around your shop’s tools. Fewer bends and one thickness keep cost down.
Q3. What is the rule of thumb for sheet metal design?
Most features should be one to four times the metal’s thickness. Holes sit 2T from edges and each other. Flanges are at least 4T long.
Q4. What is bend relief in sheet metal?
It is a small cut at the end of a bend line, where the bend meets a flat edge. It stops the metal from tearing or bulging.
Q5. How do you design a sheet metal enclosure?
Use as few pieces as you can, add corner relief, keep vents 2T from bends, place hardware early, and leave room for welding and finish.
Q6. What is the best sheet metal design software?
Popular choices include SolidWorks, Autodesk Fusion 360, Inventor, and Onshape. Pick one with a sheet metal mode and flat pattern export, and ask your shop which file types it prefers.
Q7. Why do shops send sheet metal designs back?
Common reasons are holes too close to bends, missing thickness or material, no bend relief, and unclear bend details on the drawing.
Get Your Design Reviewed Before You Release It
Send us your CAD file before you finalize the drawing. The RiAlto Manufacturing team will check hole spacing, relief cuts, and bend access against our real machines. You get a clear quote with fewer redesigns. Click Request a Quote to start.